Got lots of money and no patience? You’re in luck, you can get a Spektrum DM9 module for your Taranis quickly, and have it bind to your Inductrix easily.
Unfortunately the module is $59 from eBay, …but it arrives within 3 days and it works.
You’ll need to create a new model on your Taranis, and as shown on the picture below, disable the internal RF module, enable the external RF module, mode on PPM, CH1-8, 22.5ms, 400u, negative polarity.
Bind
To bind, follow this sequence:
Switch off Taranis
Switch on Inductrix and wait for blue LED to flash rapidly
Hold down bind button on DM9 module (the only button on it) and keep it held while turning on Taranis
DM9 will have a flashing orange LED, then solid orange LED, then go out, now you can let go of the bind button.
Blue flashing LED on Inductrix should stop flashing and go solid blue. Now you’re bound.
If the above doesn’t work, keep trying, remove the module from your Taranis and then put it back in and try again. It took me about 5 attempts. At the moment it appears you have to re-bind every time you reboot, but I’m working on a solution for that. EDIT: Appears to be permanently bound now, maybe you have to rebind a couple of times before it remembers?
Channel Direction
My Yaw and Roll channels needed to be reversed within my model setup on the Taranis, there is a nice easy instruction video here: https://www.youtube.com/watch?v=I046G6cW9W8
Timer
Within your model setup on the Taranis you can also add a countdown timer, since the inductrix batteries don’t last long. In Timer 1 choose: THs (throttle start) 3:30 (my conservative estimate), minute call: on, countdown: voice.
Range
If you experience loss of range, open up the DM9 module and ensure the UFL connector is still plugged in. Mine wasn’t, but it still flew!
If you’re having problems getting cleanflight to recognise your Naze board and you’re on a Mac, do the following:
Using USB to connect to the Naze32 requires the installation of the SiLabs CP2102 VCP Drivers. The drivers are available for download directly from the SiLabs Website
Force the serial connection to be recognized by running the following line at the command terminal: sudo ln -s /dev/tty.SLAB_USBtoUART /dev/tty.usbserial
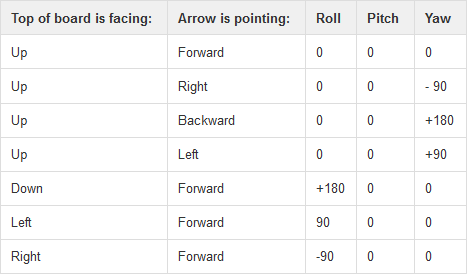
Normally your CC3D should be mounted with the arrow pointing towards the front of your quadcopter, and the USB towards the back. However, this makes it difficult to plug in the USB cable, so instead you can mount it with the arrow pointing a different direction by using the table below as a guide:
After you have mounted using a new orientation, launch the OpenPilot GCS software on your computer and connect your CC3D to your USB port. In the configuration tab, click on Attitude. Here you can adjust the values based on the table above, and then click save.
I have my arrow pointing left, so my USB port is easily accessible on the right, therefore the Yaw value is set to 90
Important Note:
You must set this value again every time you update or reset the board, or run the calibration wizard (it resets everything)
If you’re bad at soldering (like me), make a wiring loom instead of using a power distribution board, it’ll be easier to solder (I’m presuming!).
Don’t cut your wires too short
Make sure you know which way the motors are going to spin, and which way your flight controller wants them to spin, before you do any soldering. Looking at your motor and ESC from the top, if you solder the wires straight from the motor to the ESC the motor will spin anti clockwise. To get it to spin clockwise just cross over any two of the wires.
If you use the CC3D flight controller, mount it so the USB port is facing sideways for easy access, then inform the Ground Station Software of this change
Learn how to bind your Tx to its Rx early in the build, you can use the power from an ESC rather than buying a binding battery
Don’t impulse buy, read a lot and learn before making the wrong purchase
If your ESC’s have linear BEC’s onboard, then you don’t need to cut the power from any of them before connecting the your flight controller
You should definitely buy William Gibson’s excellent glimpse into the future “Neuromancer”, you should also listen to Gibson himself reading the book. You’ll need to buy the book as reference if nothing else, some of the amazing ideas and concepts are flicked over so quickly, the book will allow you to pause, read and absorb them.
Once you get this thing worked out, its pretty neat.
Out of the box it provides automatic historical location tracking, with position history plotted on a Google map. At any time you can manually request its current position by sending it a text, or by using the included iPhone app/Android app (more info about these coming soon).
RF-V16 Location playback
By default, the device will automatically record and upload its location every 10 minutes. To maximise battery life, the GPS chip inside will “sleep” in between those 10 minute intervals, waking for 30 seconds to obtain and upload a position, before going back to sleep.
The GPS chip utilizes GPRS and Assisted GPS, in order to expedite the process of obtaining satellite information. For this very reason, it is important that your SIM card includes a data plan. My device was only able to provide an inaccurate LBS position until I enabled data on my SIM card, at which point it became nicely accurate.
Which SIM card?
The RF-V16 uses GPRS to send and receive data. A 2G, or 3G, or even 4G SIM card will work, but only a maximum of 2G is used. I chose T-Mobile as my carrier – their SIM card supports 2G automatically, which operates at 850MHz/1900MHz on the GSM network (other carriers are presumably the same?). This is perfect for the RF-V16 because it is a quad-band device which uses 850/900/1800/1900MHz. T-Mobile also confirmed to me that their SIM card can be used in GPS tracking devices.
I use their “pay by the day” package – it’s $2 for unlimited 2G data for each day that you use. I only use my RF-V16 once per week, attached to my quadcopter, so it’s $2 for peace of mind that I’ll be able to find it if the worst happens. I know there are cheaper data plans out there, but I haven’t researched them yet. Do what works best for you, in your home country.
You need to buy your SIM card, activate it, and manage the funds etc. I used an iPhone 4 when doing this because it supports the same size microSIM card as the RF-V16. When activating the SIM card, T-Mobile will ask you for the IMEI of the device it’ll be used in. The RF-V16 has its own IMEI, shown on a sticker on the back of the device. I didnt supply this to T-Mobile and it didn’t seem to make a difference, so I’ll leave it up to you to decide on whether to do that.
Using the device
Inserting the SIM card
The microSIM should be inserted this way up. Push it in, and it’ll “click” into place. Push it in again to release.
Powering on/off and charging
Hold down the power button for 3 seconds.
A magical tune is played when starting up.
A “progressive build-up” tune is played when shutting down.
When you plug in the charger, the device will shut down without playing a tune, then it will restart, play the magical tune, and start charging.
The light on the charger is red when charging, green when finished.
If you have a tune constantly playing while charging, this is because the device is rebooting over and over. To prevent this, make sure your SIM card is installed while charging.
Set the master number
You need to let the RF-V16 know who is boss. Send it a text in the following format:
<password>,<username>,<phone number>#
The default password is 123456, so for example: 123456,sos1,3123911234#
Don’t forget the #
All commands sent to the device must be appended with a # symbol, otherwise they will be ignored. Also, don’t use spaces in any of the commands as they’ll make the command invalid.
Admin users
You can assign up to 5 users (phones) which are allowed to communicate with your RF-V16. These users should have the following usernames: sos1, sos2, sos3 etc. You can then use the command 123456,sos3,075*******0# to activate a new user.
Status update
Text dsp# to your device and it’ll reply with a status update letting you know which features are switched on or off. It lets you know the GSM signal strength, and confusingly the GPS signal strength. It’s confusing because, as I mentioned earlier, the GPS is only awake (valid) for 30 seconds every 10 minutes, or when you manually request the location. So don’t be concerned when you see “GPS Signal: Sleep” in the status response – it’s normal and saves battery life.
Data transfer
By default, position data is uploaded and recorded on gps123.org (see Mapping Platform section below) every 10 minutes. If you wanted to change this frequency to 20 minutes, for example, you would use the following command:
tim,20#
The minimum time you can set is 1 minute (tim,1#) – on this setting, the GPS never goes to sleep and battery life is greatly reduced to around 5-6 hours (according to the manufacturer).
Data can also be switched on and off using the following commands:
gon# = data on (default)
goff# = data off
You do not need data on (gon#) for the RF-V16 to function correctly, having data on means the position is periodically uploaded and stored online. If you simply want to query the device for its location on demand, turn data off (goff#) and just send a text (dw#) whenever you want. The “data” mentioned here is not to be confused with having a data plan with your SIM card, that is definitely required.
Calling
You can call the RF-V16 and it will play a tune loudly. This can be helpful when you’re nearby – you can listen out for the tune and locate the device if it’s attached to a quadcopter, for example. You should deactivate voicemail on your SIM card, otherwise it’ll stop ringing. There is also an SOS button on the device, so it can call you. You can also have it auto-answer incoming calls so that you can listen in to whatever is around the device.
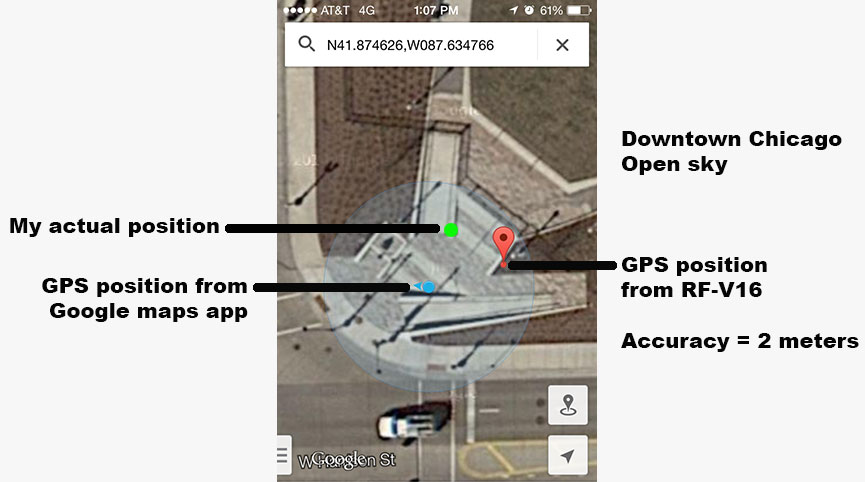
Accuracy
I live in downtown Chicago. The buildings and general interference definitely cause a problem for the RF-V16, but if you move into an open sky area it works very well. Below is a comparison of my reported location in the Google maps app on iPhone 5 vs the RF-V16, resulting in 2 meter accuracy:
Mapping Platform
www.gps123.org is where the device uploads its position. You login using the ID number on the back of your device and the default password (123456), or your own pre-selected password. Here you can setup geo-fencing, playback, device statistics, device management, reset your password, and view historical data. It’s all good, but not really required for basic tracking. All you need is to send a text message to the device, but do take a look anyway.