function YOURTHEME_preprocess_page(&$variables) {
//add assets for specific node
if ($variables['node']->nid == 12781) {
drupal_add_css(drupal_get_path('theme', 'YOURTHEME') . "/css/foo.css");
drupal_add_js(drupal_get_path('theme', 'YOURTHEME') . "/js/bar.js");
}
}
Blog
-
Include node specific JS/CSS in Drupal
-
Cleanflight on Mac OSX
If you’re having problems getting cleanflight to recognise your Naze board and you’re on a Mac, do the following:
- Using USB to connect to the Naze32 requires the installation of the SiLabs CP2102 VCP Drivers. The drivers are available for download directly from the SiLabs Website
- Force the serial connection to be recognized by running the following line at the command terminal: sudo ln -s /dev/tty.SLAB_USBtoUART /dev/tty.usbserial
- Fire up Cleanflight!
-
Drupal: How to apply the img-responsive class to all images in your bootstrap subtheme
UPDATE: This is now included by default and should not be used.
In your subtheme’s template.php file, add the following:
function YOURTHEMENAME_preprocess_image(&$vars) { $vars['attributes']['class'][] = 'img-responsive'; // http://getbootstrap.com/css/#overview-responsive-images } -
What happens when you reach your parse.com request limit?
This is what happens:

Next: How to cache parse requests…
-
How to install Drupal with PostgreSQL on Windows 7
So you want to see this?

No problem, just follow my instructions:
- Download the latest version of Drupal and extract into c:\dev\drupal
- Download and install Postgres
- Download EasyPHP and install in c:\dev
- Once installed, double click on EasyPHP task menu icon and stop Apache and MySQL
- Add the following to your PATH environment variable: C:\Program Files\PostgreSQL\9.4\lib; (or change the path if thats not where you installed Postgres)
- Edit your php.ini file (found here: C:\dev\EasyPHP-DevServer-14.1VC9\binaries\php\php_runningversion) and remove the semicolon prededing “extension=php_pdo_pgsql.dll” and “extension=php_pgsql.dll”
- Double click on EasyPHP task menu icon and start Apache
- Right-click on EasyPHP task menu icon and choose Administer
- On the Admin screen, in the Local Files section, add a new alias (name: your-site, path: C:\dev\drupal\drupal-7.38 <- from step 1)
- Visit http://127.0.0.1/your-site/ and follow the Drupal setup wizard
- Install standard version of Drupal, on database setup screen you will now have the option to choose “PostgreSQL”
- From your Start Menu, find PostgreSQL and open “pgAdmin” tool
- Right click and choose Connect
- Get the database name (postgres), hostname (localhost), port number (5432) and username (postgres) and password (set this yourself)
- Enter the details and you’re all set.
-
How to patch/hotfix your CQ5 website
You can use a package to patch your javascript, if you find a bug in production and dont want to perform a production deploy. In other words, if you need a quick fix…
- Make a package containing the file you wish to patch, perhaps a javascript file in your clientlibs, install it in the package manager in your production author.
- Go into CRX/DE, drill down to the file you are patching, click on it, click the replication tab, click replicate
- Go to the CQ welcome screen, Tools > Replication > Activate Tree > Drill down, select file, activate
- Update cachebreaker which will force clientlibs to recompile
-
Parse.com Javascript SDK + Disqus SSO Integration
Universal code:
function enableDisqus(config, sso_config) { console.log("is disqus already loaded: " + enableDisqus.loaded); if (enableDisqus.loaded) { DISQUS.reset({ reload: true, config: function () { this.page.identifier = config.identifier; this.page.url = config.url; this.page.title = config.title; } }); console.log('disqus reset', config.identifier, config.url); } else { console.log('disqus not loaded'); var body = "var disqus_shortname = \"" + config.shortname + "\";\n" + "var disqus_title = \"" + config.title + "\";\n" + "var disqus_identifier = \"" + config.identifier + "\";\n" + "var disqus_url = \"" + config.url + "\";\n"; if (config.developer) { body += "var disqus_developer = 1;\n" } appendScriptTagWithBody(body); (function() { var dsq = document.createElement('script'); dsq.type = 'text/javascript'; dsq.async = true; dsq.src = 'http://' + disqus_shortname + '.disqus.com/embed.js'; (document.getElementsByTagName('head')[0] || document.getElementsByTagName('body')[0]).appendChild(dsq); })(); if (sso_config) { var remote_auth_s3 = sso_config.message + " " + sso_config.sig + " " + sso_config.timestamp; var body = "var disqus_config = function() {\n" + " this.page.remote_auth_s3 = \"" + remote_auth_s3 + "\";\n" + " this.page.api_key = \"" + sso_config.api_key + "\";\n" + " this.sso = {\n" + " name: 'SampleNews',\n" + " button: 'http://example.com/images/logo.png',\n" + " icon: 'http://example.com/images/favicon-96x96.png',\n" + " url: 'http://example.com/signin',\n" + " logout: 'http://example.com/logout',\n" + " width: '800',\n" + " height: '400'\n" + " };\n" + "};\n" appendScriptTagWithBody(body) } enableDisqus.loaded = true; } } function appendScriptTagWithBody(body) { var dso = document.createElement("script"); dso.type = "text/javascript"; dso.async = true; dso.text = body; console.log(body); document.getElementsByTagName('body')[0].appendChild(dso); }When your page content changes and you need to load new comments:
//load the comments if (isLoggedIn()) { //prepare SSO var disqusData = { id: Parse.User.current().getSessionToken(), username: Parse.User.current().getUsername(), email: Parse.User.current().getEmail() }; var disqusStr = JSON.stringify(disqusData); var disqussso_timestamp = Math.round(+new Date() / 1000); var disqussso_message = Base64.encode(disqusStr); var disqussso_result = CryptoJS.HmacSHA1(disqussso_message + " " + disqussso_timestamp, "your disqus api"); var disqussso_hexsig = CryptoJS.enc.Hex.stringify(disqussso_result); } enableDisqus( { shortname: "your_shortname", title: "your product name", identifier: 'your-' + productId, url: "product page url" }, { api_key: "your_disqus_api_key", message: disqussso_message, sig: disqussso_hexsig, timestamp: disqussso_timestamp } );Dependancies:
- http://code.google.com/p/crypto-js
- http://stackoverflow.com/questions/246801/how-can-you-encode-a-string-to-base64-in-javascript
Did you find this post useful?
Tip me some bitcoin:
-
How to get free SSL for your Parse.com hosted app
This tutorial assumes you are using Parse.com hosting (yourapp.parseapp.com) and have applied a custom domain name (yourapp.com) upon which SSL will be used.
- Visit startssl.com and signup for a free SSL certificate, save the ssl.key and ssl.cert files when prompted
- Visit Settings > Hosting page in your Parse.com dashboard
- Upload the file ssl.cert into the SSL Public Certificate field
- Go back to startssl.com > Toolbox > Decrypt Private Key, save decrypted file as privatekey.pem
- Upload privatekey.pem to Parse.com in the SSL Private Key field
-
How to use Backgrid.js and the Parse.com Javascript SDK
Create a Backgrid populated with data from Parse.com and have it auto save back to Parse when a field is edited:
//load my Parse.com Class called "parts" var Part = Parse.Object.extend("parts", { //save the data back to parse.com when it changes initialize: function() { Parse.Object.prototype.initialize.apply(this,arguments); this.on("change", function (model,options) { if (options && options.save === false) return; model.save() }); } }); var Parts = Parse.Collection.extend({ model: Part }); var columns = [{ name: "id", label: "ID", editable: false, // By default every cell in a column is editable, but *ID* shouldn't be cell: Backgrid.IntegerCell.extend({ orderSeparator: '' }) }, { name: "name", label: "Name", cell: "string" }, { name: "description", label: "description", cell: "string" }]; var parts = new Parts(); // Initialize a new Grid instance var grid = new Backgrid.Grid({ columns: columns, collection: parts }); // Render the grid and attach the root to your HTML document $("#results-grid").append(grid.render().el); // Fetch some countries from the url parts.fetch({reset: true}); -
How to change the orientation of your CC3D flight controller
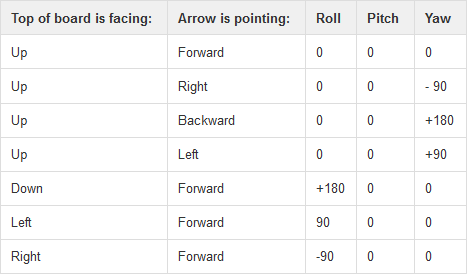
Normally your CC3D should be mounted with the arrow pointing towards the front of your quadcopter, and the USB towards the back. However, this makes it difficult to plug in the USB cable, so instead you can mount it with the arrow pointing a different direction by using the table below as a guide:

After you have mounted using a new orientation, launch the OpenPilot GCS software on your computer and connect your CC3D to your USB port. In the configuration tab, click on Attitude. Here you can adjust the values based on the table above, and then click save.

I have my arrow pointing left, so my USB port is easily accessible on the right, therefore the Yaw value is set to 90 Important Note:
You must set this value again every time you update or reset the board, or run the calibration wizard (it resets everything)